This tutorial shows you some free, quick, and simple ways to convert a Word document into a PDF on your iPhone, iPad, or Mac.

Word files (.doc or docx) can be easily edited, while PDF files (.pdf) require special apps to make edits. So, if you plan to send a document like a resumé, rent agreement, bill, or research paper that you don’t want to be edited, PDF is an ideal choice.
Secondly, if you use a fancy font in Word files, the same may look different if someone opens that file in some other Word app on a mobile or computer. However, PDF is great for preserving style, format, and looks.
Besides that, certain websites like those related to tax and such might only allow you to upload PDF files. If you try to upload a Word file, it will show an error.
So, if you want to change a Word document to PDF due to a specific reason or one mentioned above, here are some safe, free, and swift ways to do that.
You can use any of the three ways mentioned below to export a Word document as a PDF on Mac.
Pages is a free app from Apple and you can download it from the macOS App Store. Once you have the app, follow these steps to change a Word file into a PDF.
1) Right-click on the Word file in the Finder folder and select Open With > Pages.
2) Click File from the top left.
3) Select Export To and choose PDF.
4) Optionally, set the image quality and explore other options like adding password protection to the PDF. When done, click Next.
5) Change the name and location if desired and click Export.
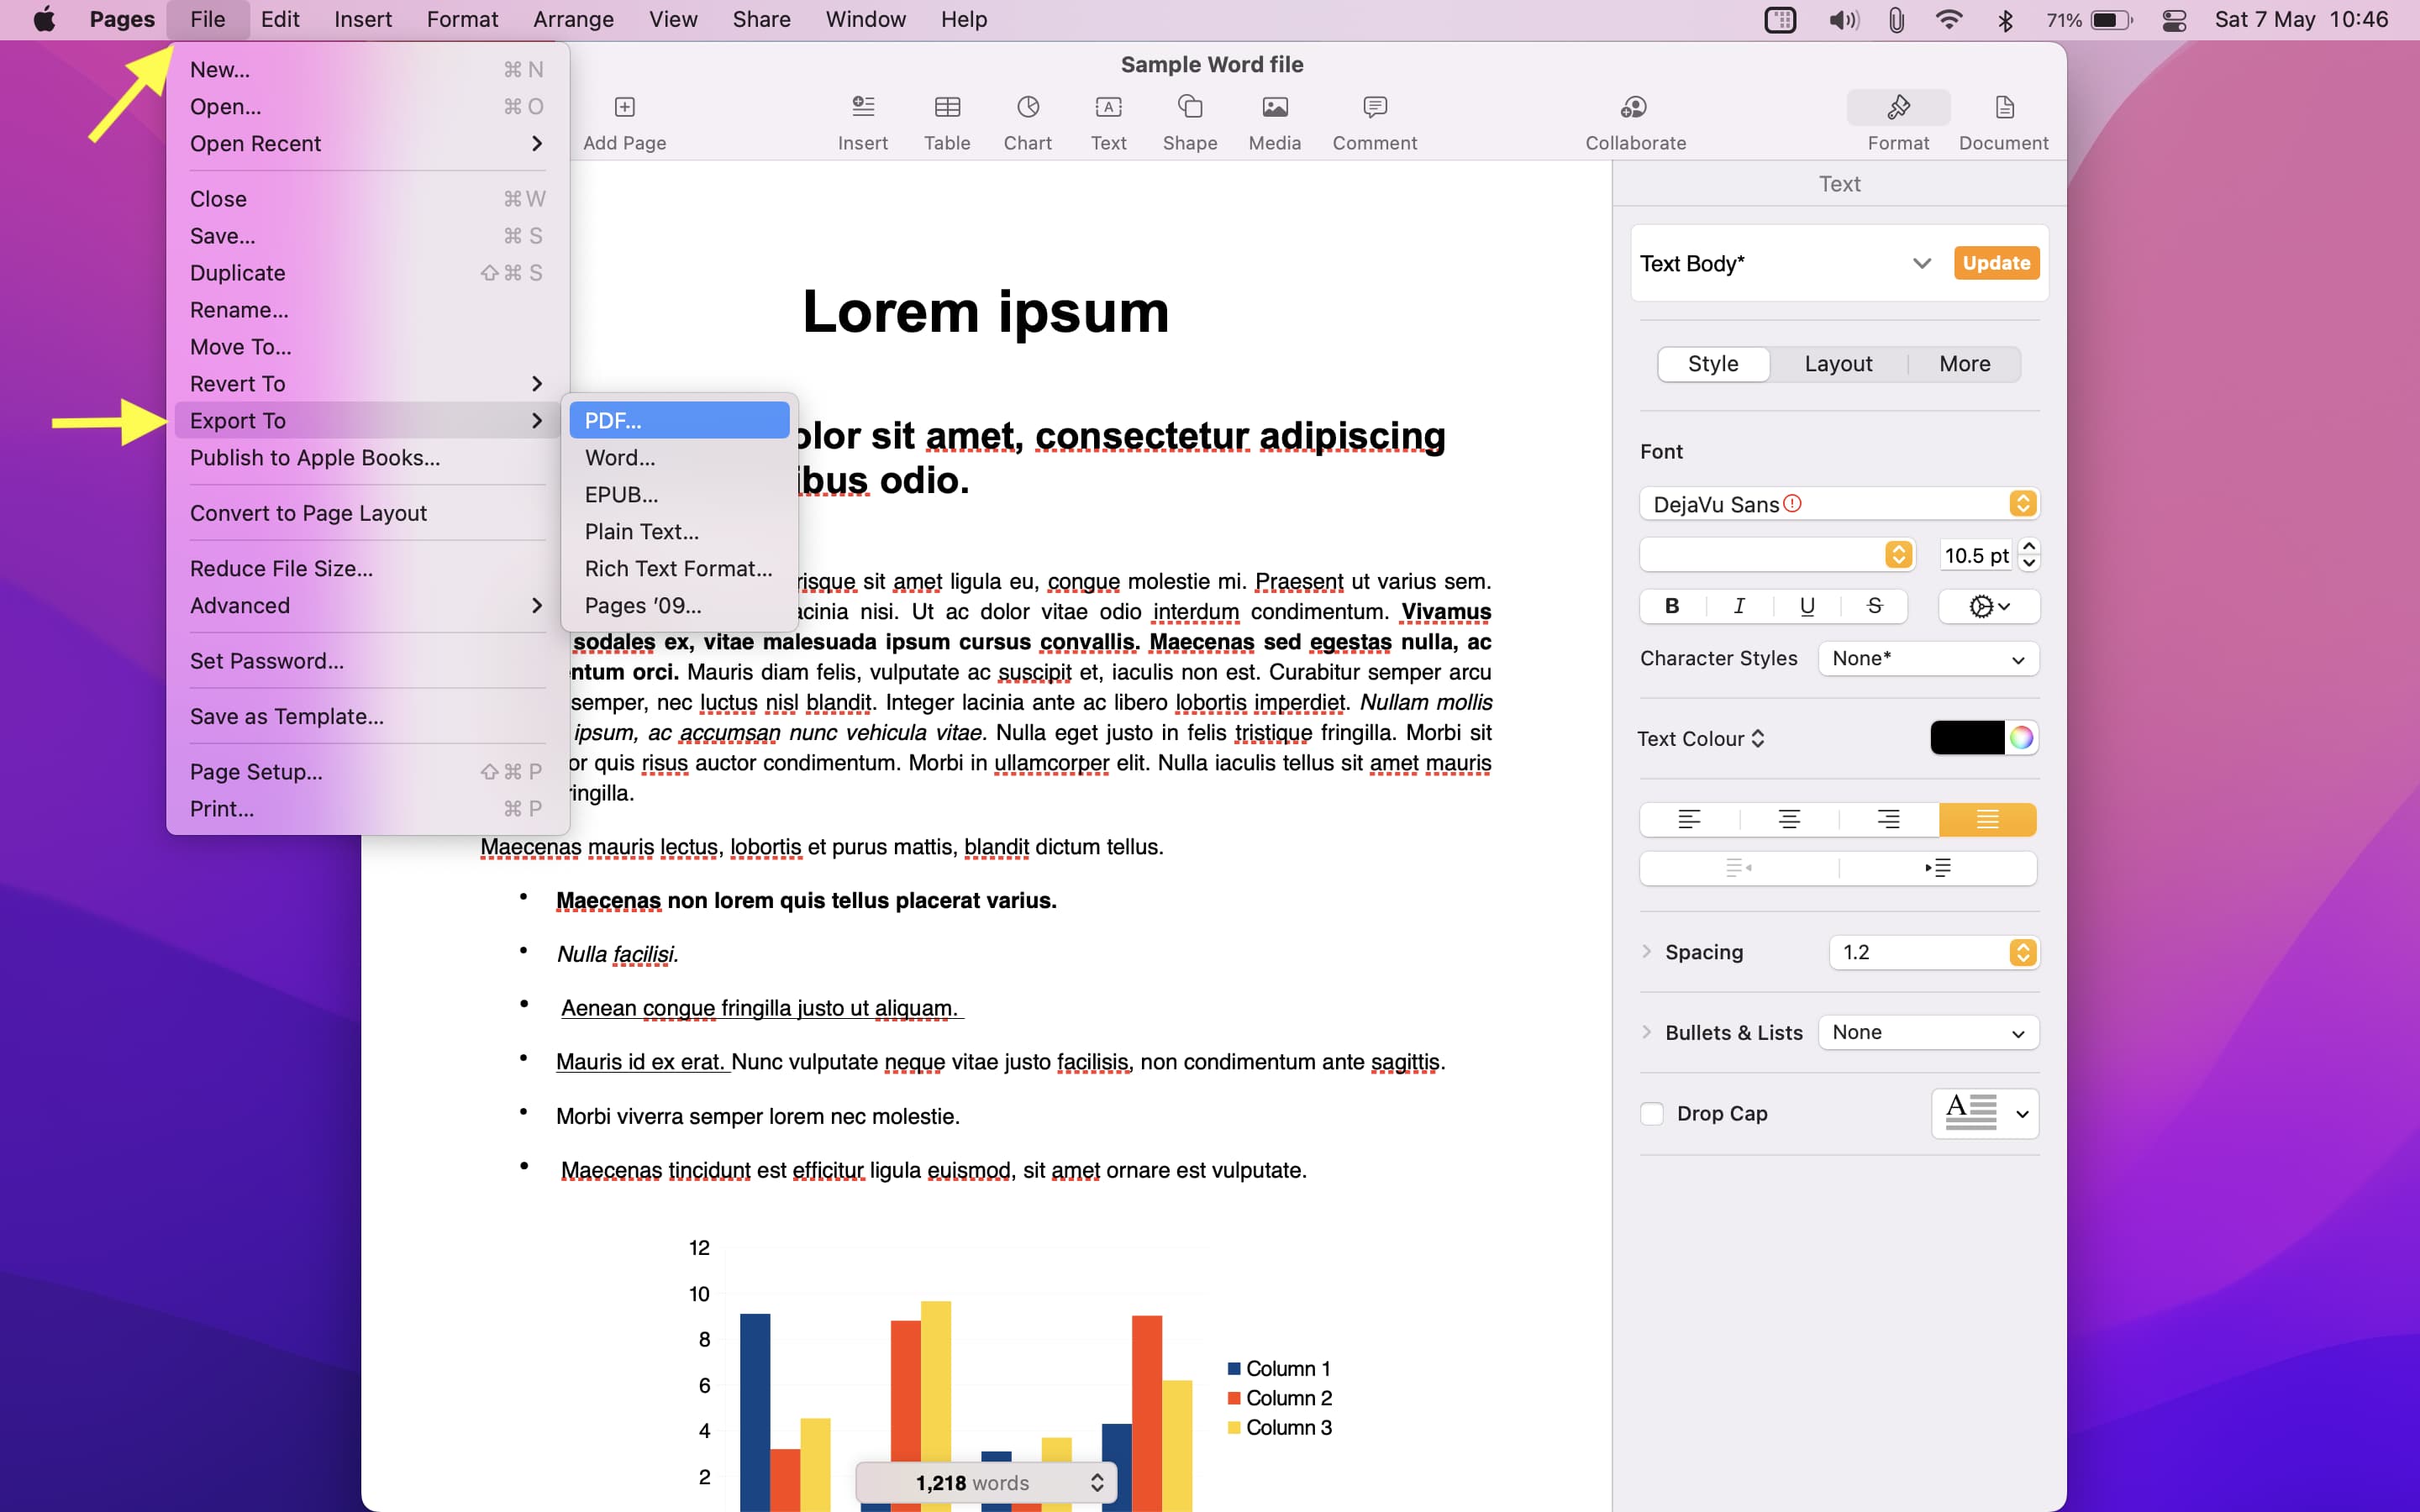
You have effortlessly converted a Word file into a PDF.
If you don’t have the Pages app, downloading it may take a while if your internet speed isn’t fast. In these situations, you can use Google Docs in your Mac’s web browser (Chrome, Safari, Firefox, etc.) to convert a Word file to PDF.
Here’s how to use Google Docs to export a Word document as a PDF:
1) Visit Google Docs at docs.google.com and make sure you’re signed in to your Google account.
2) Click Blank to start a new document.
3) Press Command + O or click File > Open.
4) Choose Upload and drag the Word file here or select from the Finder folder.
5) Once the Word file is uploaded, it should open in Google Docs. If not, click Open.
6) Select File > Download > PDF Document.
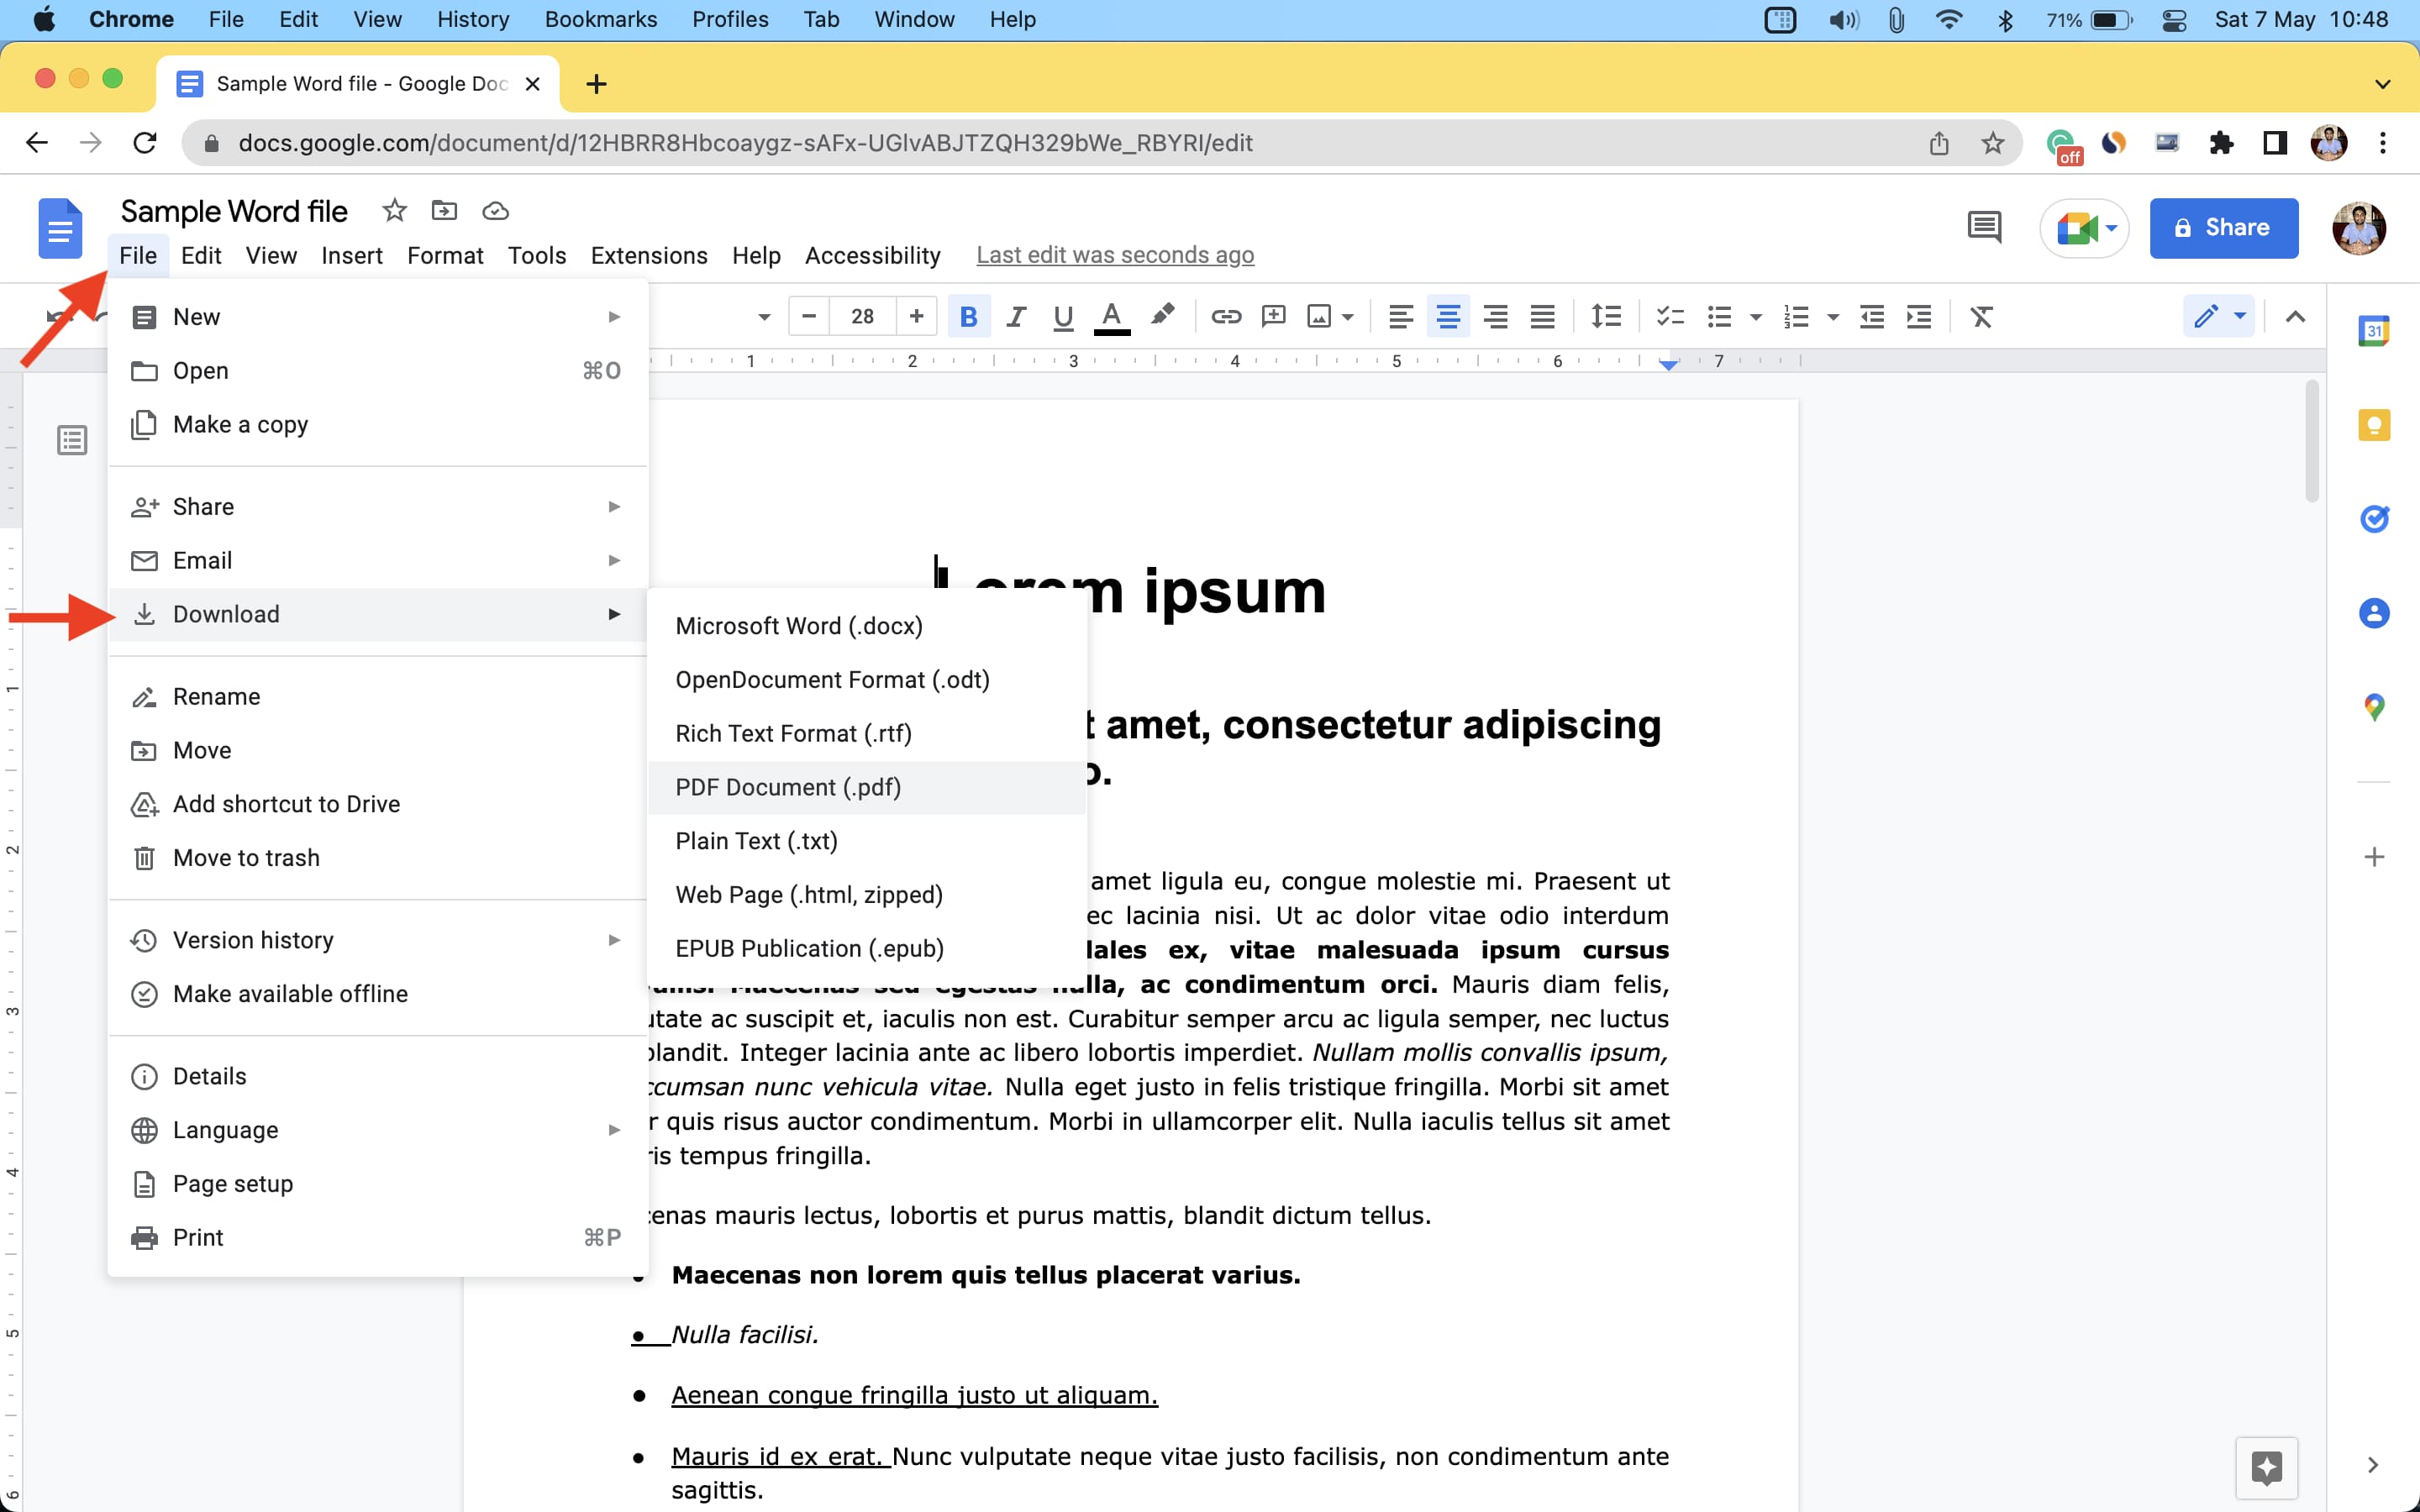
The Word file will instantly convert and save as a PDF to your Mac.
If you have some non-sensitive Word files, you can use this method to convert them instantly to PDF. The best part is, even in the free version, you can convert up to three Word files to PDF in one go. And if you subscribe to their premium plan, this number can go up to 10.
Here’s how to use iLovePDF to change a Word file to PDF:
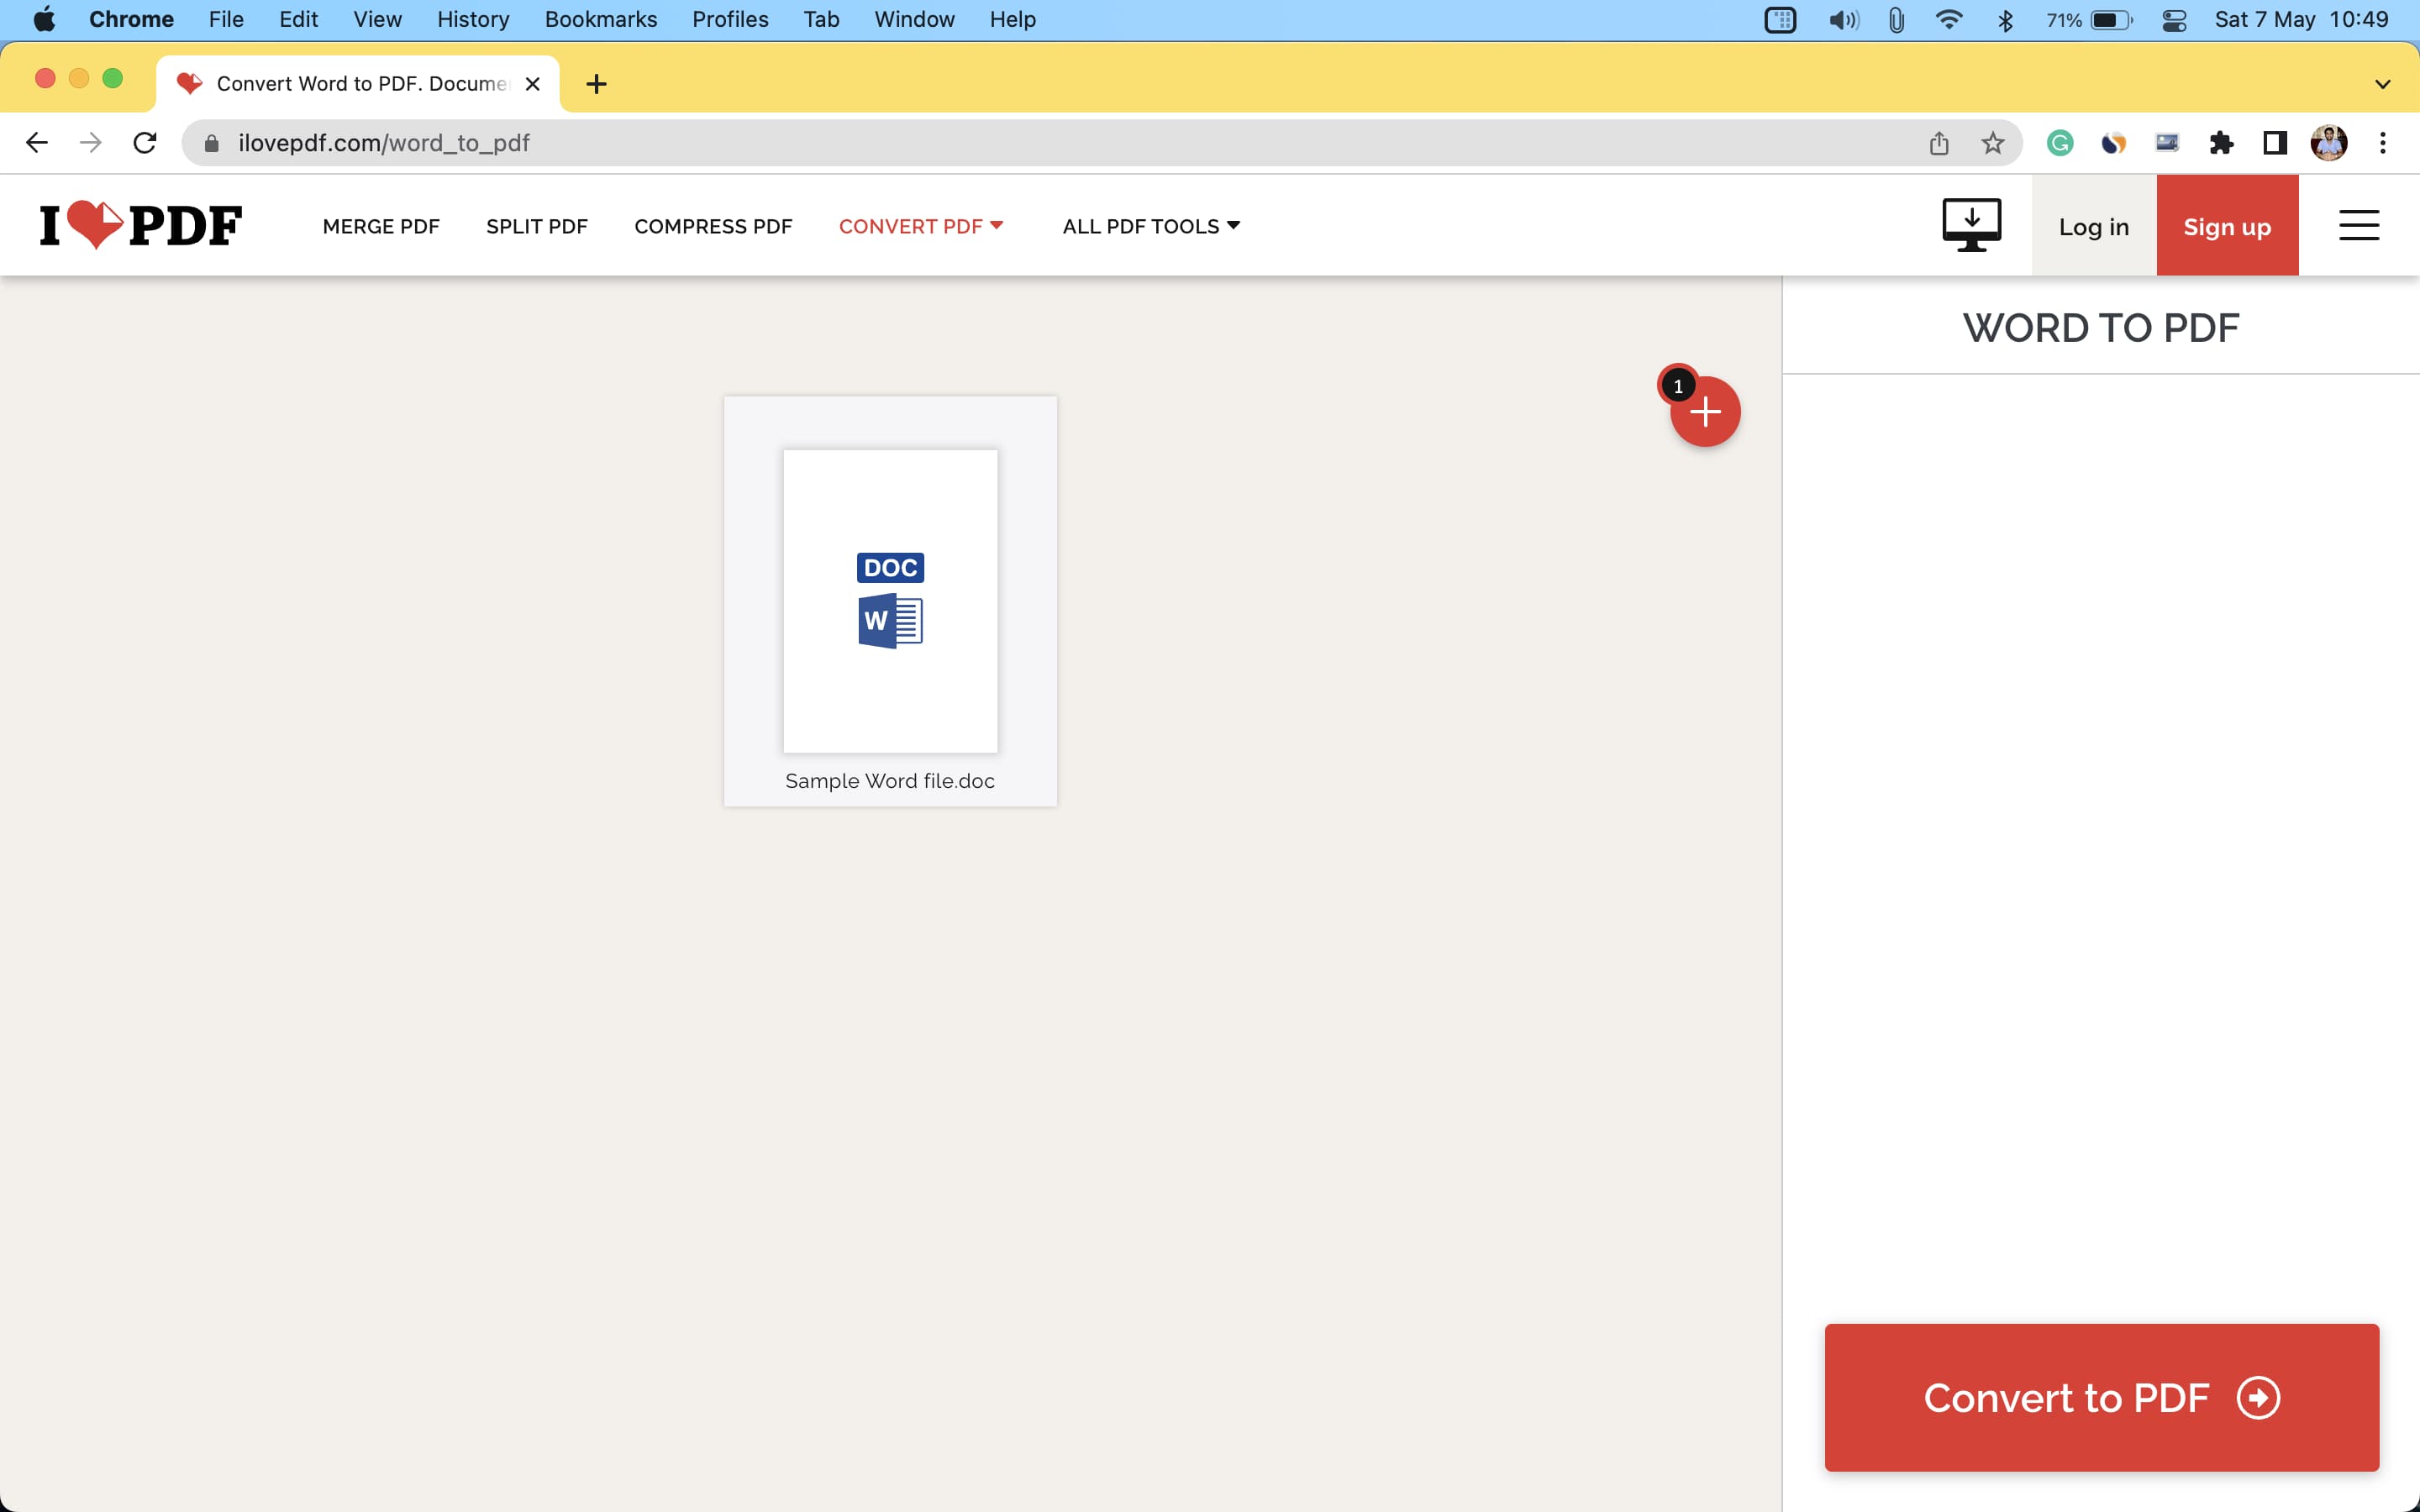
1) Visit iLovePDF.com in a web browser and go to its Convert WORD to PDF page.
2) Drag the Word files here or click Select Word files and add from your Finder.
3) Click Convert to PDF.
4) Once done, click Download PDF.
Making a Word file into a PDF is effortless on iPhone and iPad. The best part is you don’t even need an additional app!
Files app comes preinstalled on all recent versions of iOS and iPadOS. In case you deleted it, download it from the App Store. After that, make sure the Word file is saved inside the Files app.
If the Word file is in some other app, open it, tap the share icon and choose Save to Files. And in case the Word file is in a third-party cloud storage service like Google Drive, Dropbox, etc., you can simply enable these services in the Files app.
Here’s how to use the iPhone Files app to convert a Word file to PDF:
1) Open the Files app, tap Browse and go to the folder where the Word file is saved.
2) Tap the Word file, and it will open inside the Files app.
3) Select the share icon.
4) On the Share Sheet, choose Print.
5) Put two fingers on the page thumbnail and pinch out.
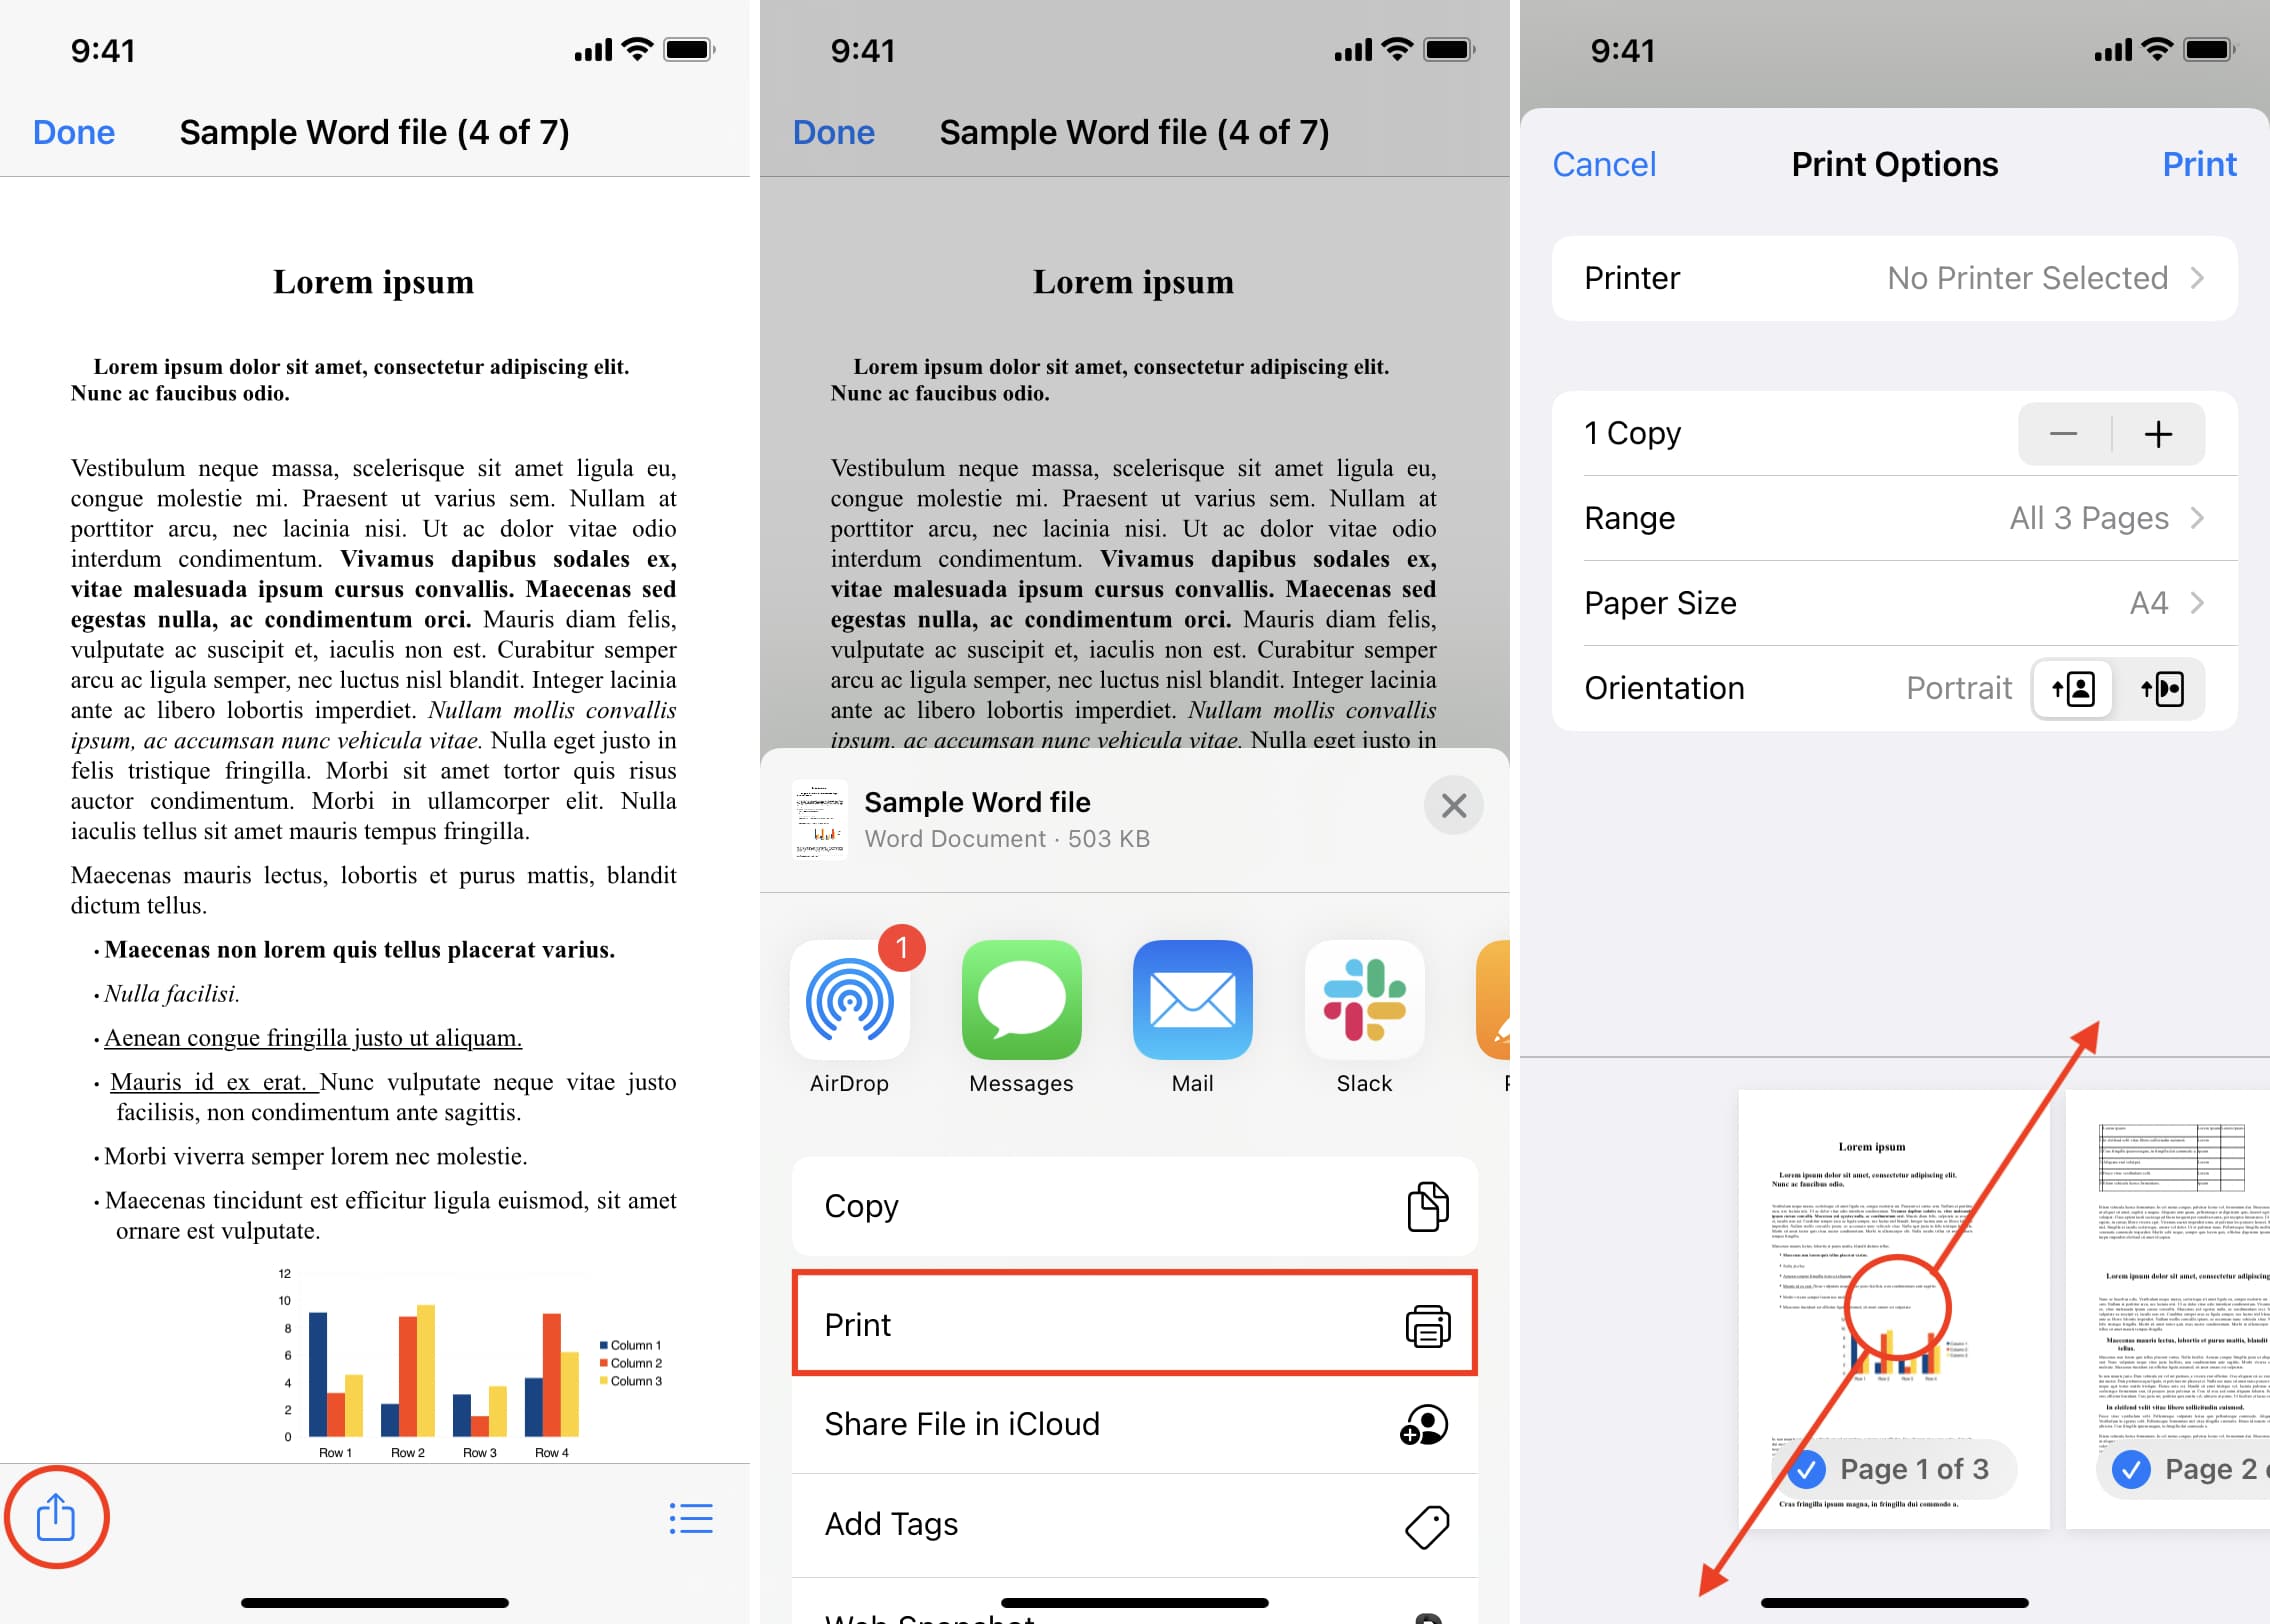
6) Tap the share icon again and choose Save to Files > choose any location > Save.
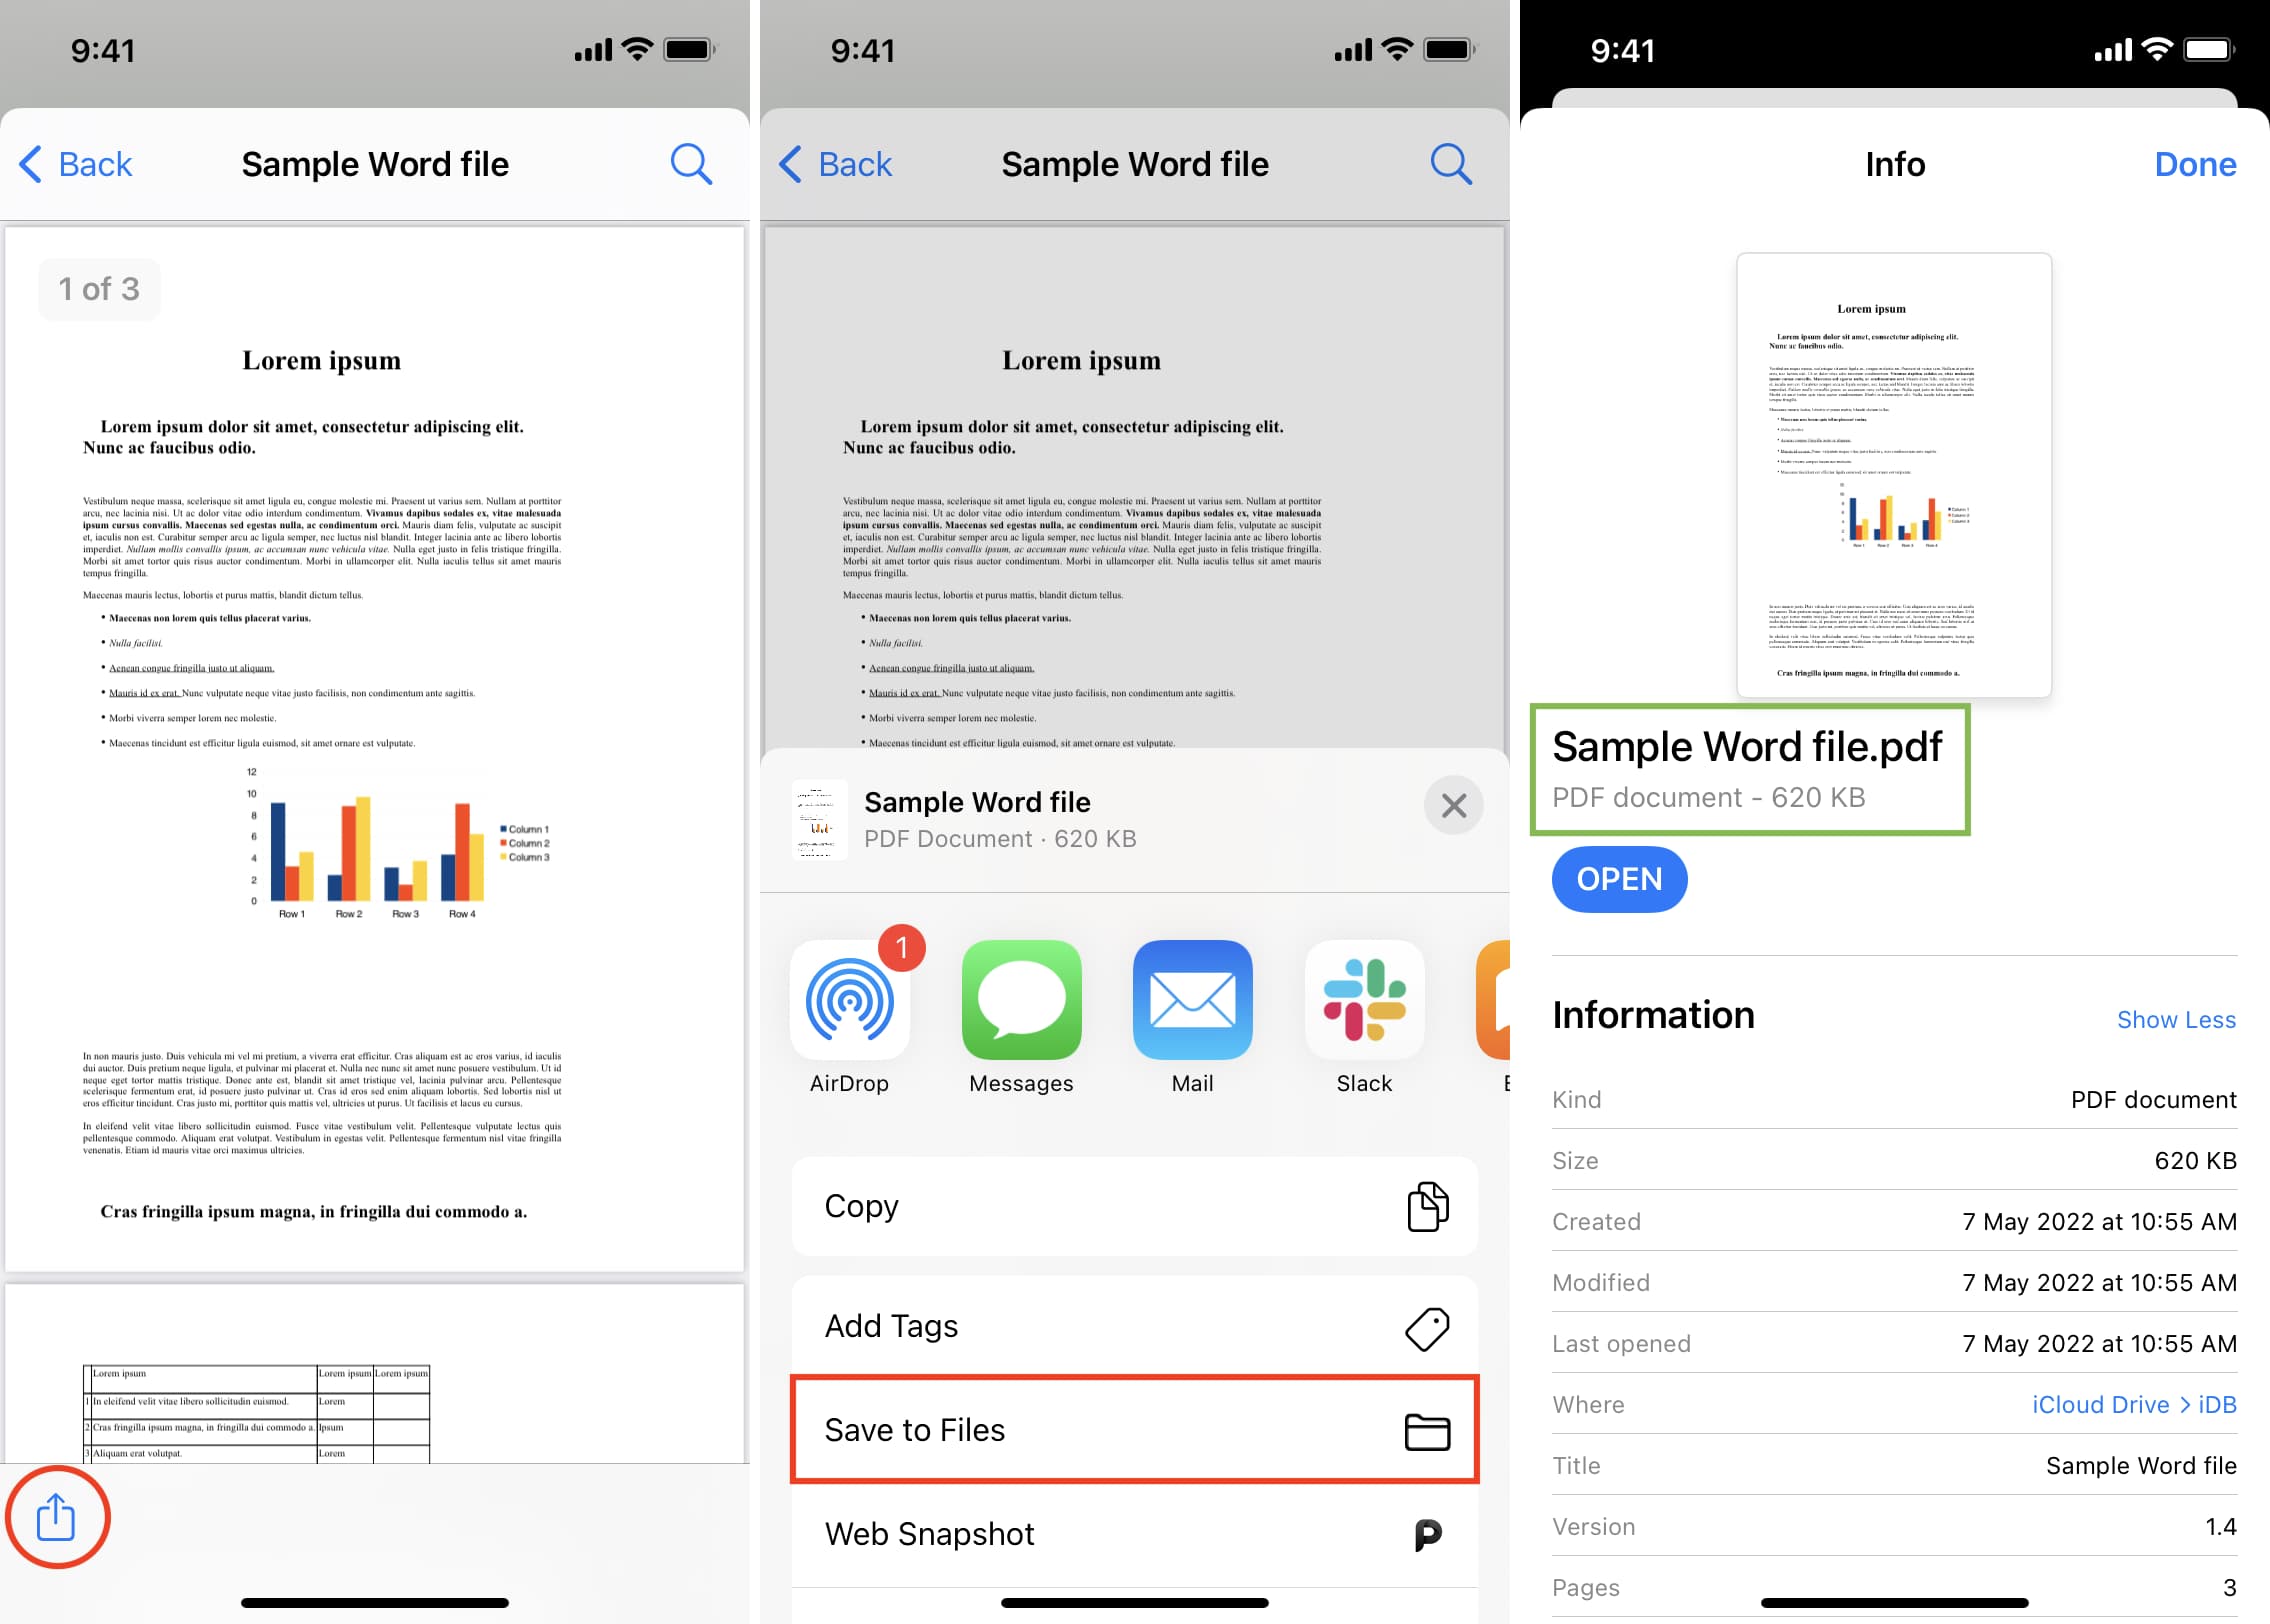
You have successfully converted a Word file into a PDF, all from the iOS Files app. To be sure, press the newly created document and tap Get Info. You will see that it’s a PDF.
With the help of this simple shortcut that I built, you can instantly convert a Word file to PDF in just a few taps.
Follow these steps to use an iOS shortcut to convert a Word document into PDF:
1) Tap this iCloud link and then tap Add Shortcut to get the Save As PDF shortcut.
2) Go to the Files app or the app where the Word file is saved. From here, open the Word file and tap the share icon.
3) In the Share Sheet, select Save As PDF.
4) The shortcut will swiftly convert the Word file to PDF. Finally, choose a folder and tap Done to save the PDF version of the document.
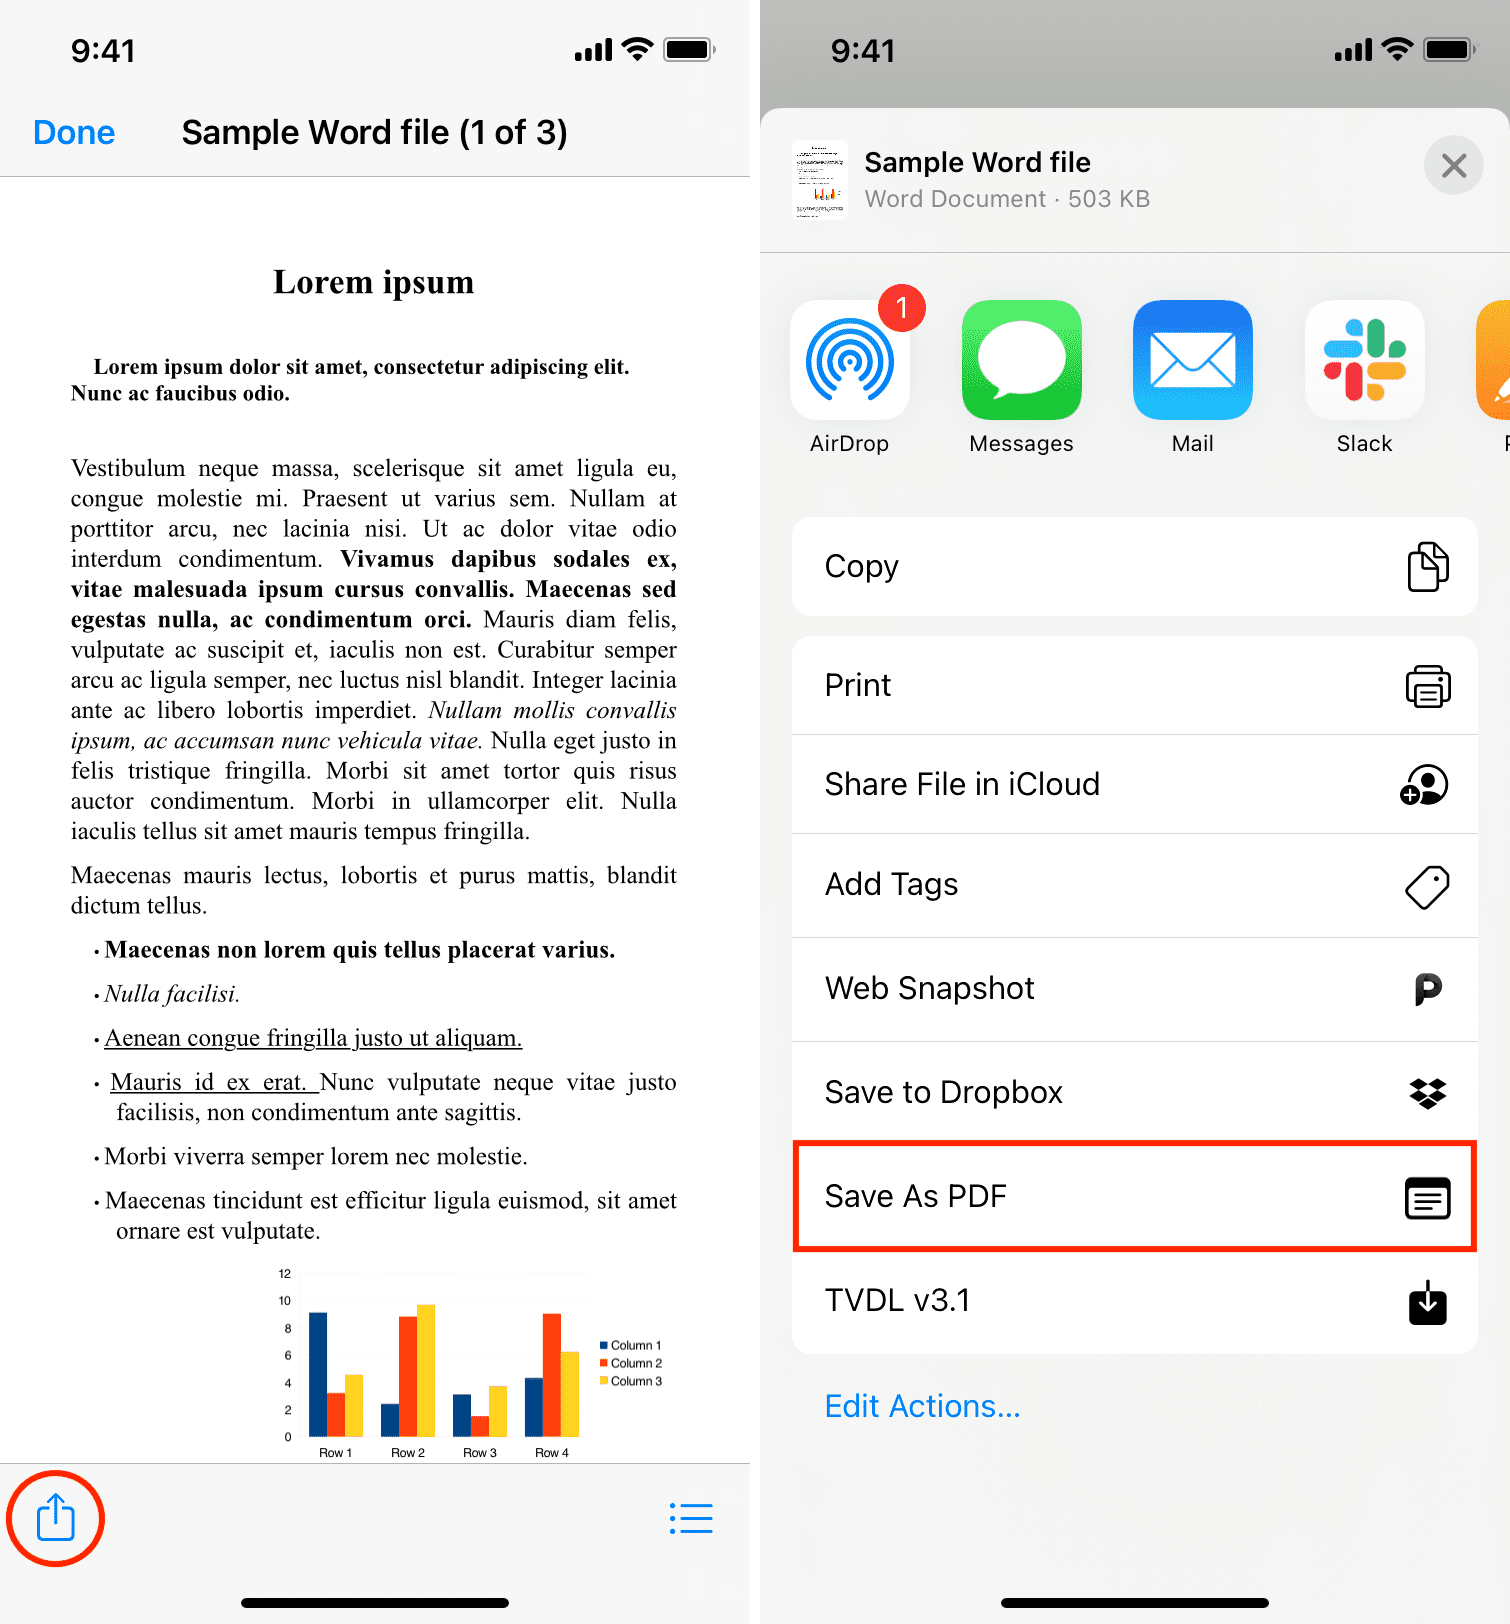
Go to the Files app folder where you saved the final converted file to access it.
Apple’s Pages app is also available as a free download on the iOS and iPadOS App Store. Get the app and follow these steps to convert a Word document into a PDF file.
Here’s how to use Pages to change a Word file to PDF on iPhone or iPad:
1) Open Pages and tap Browse. Now, go to the location where the Word file is saved and tap to open it.
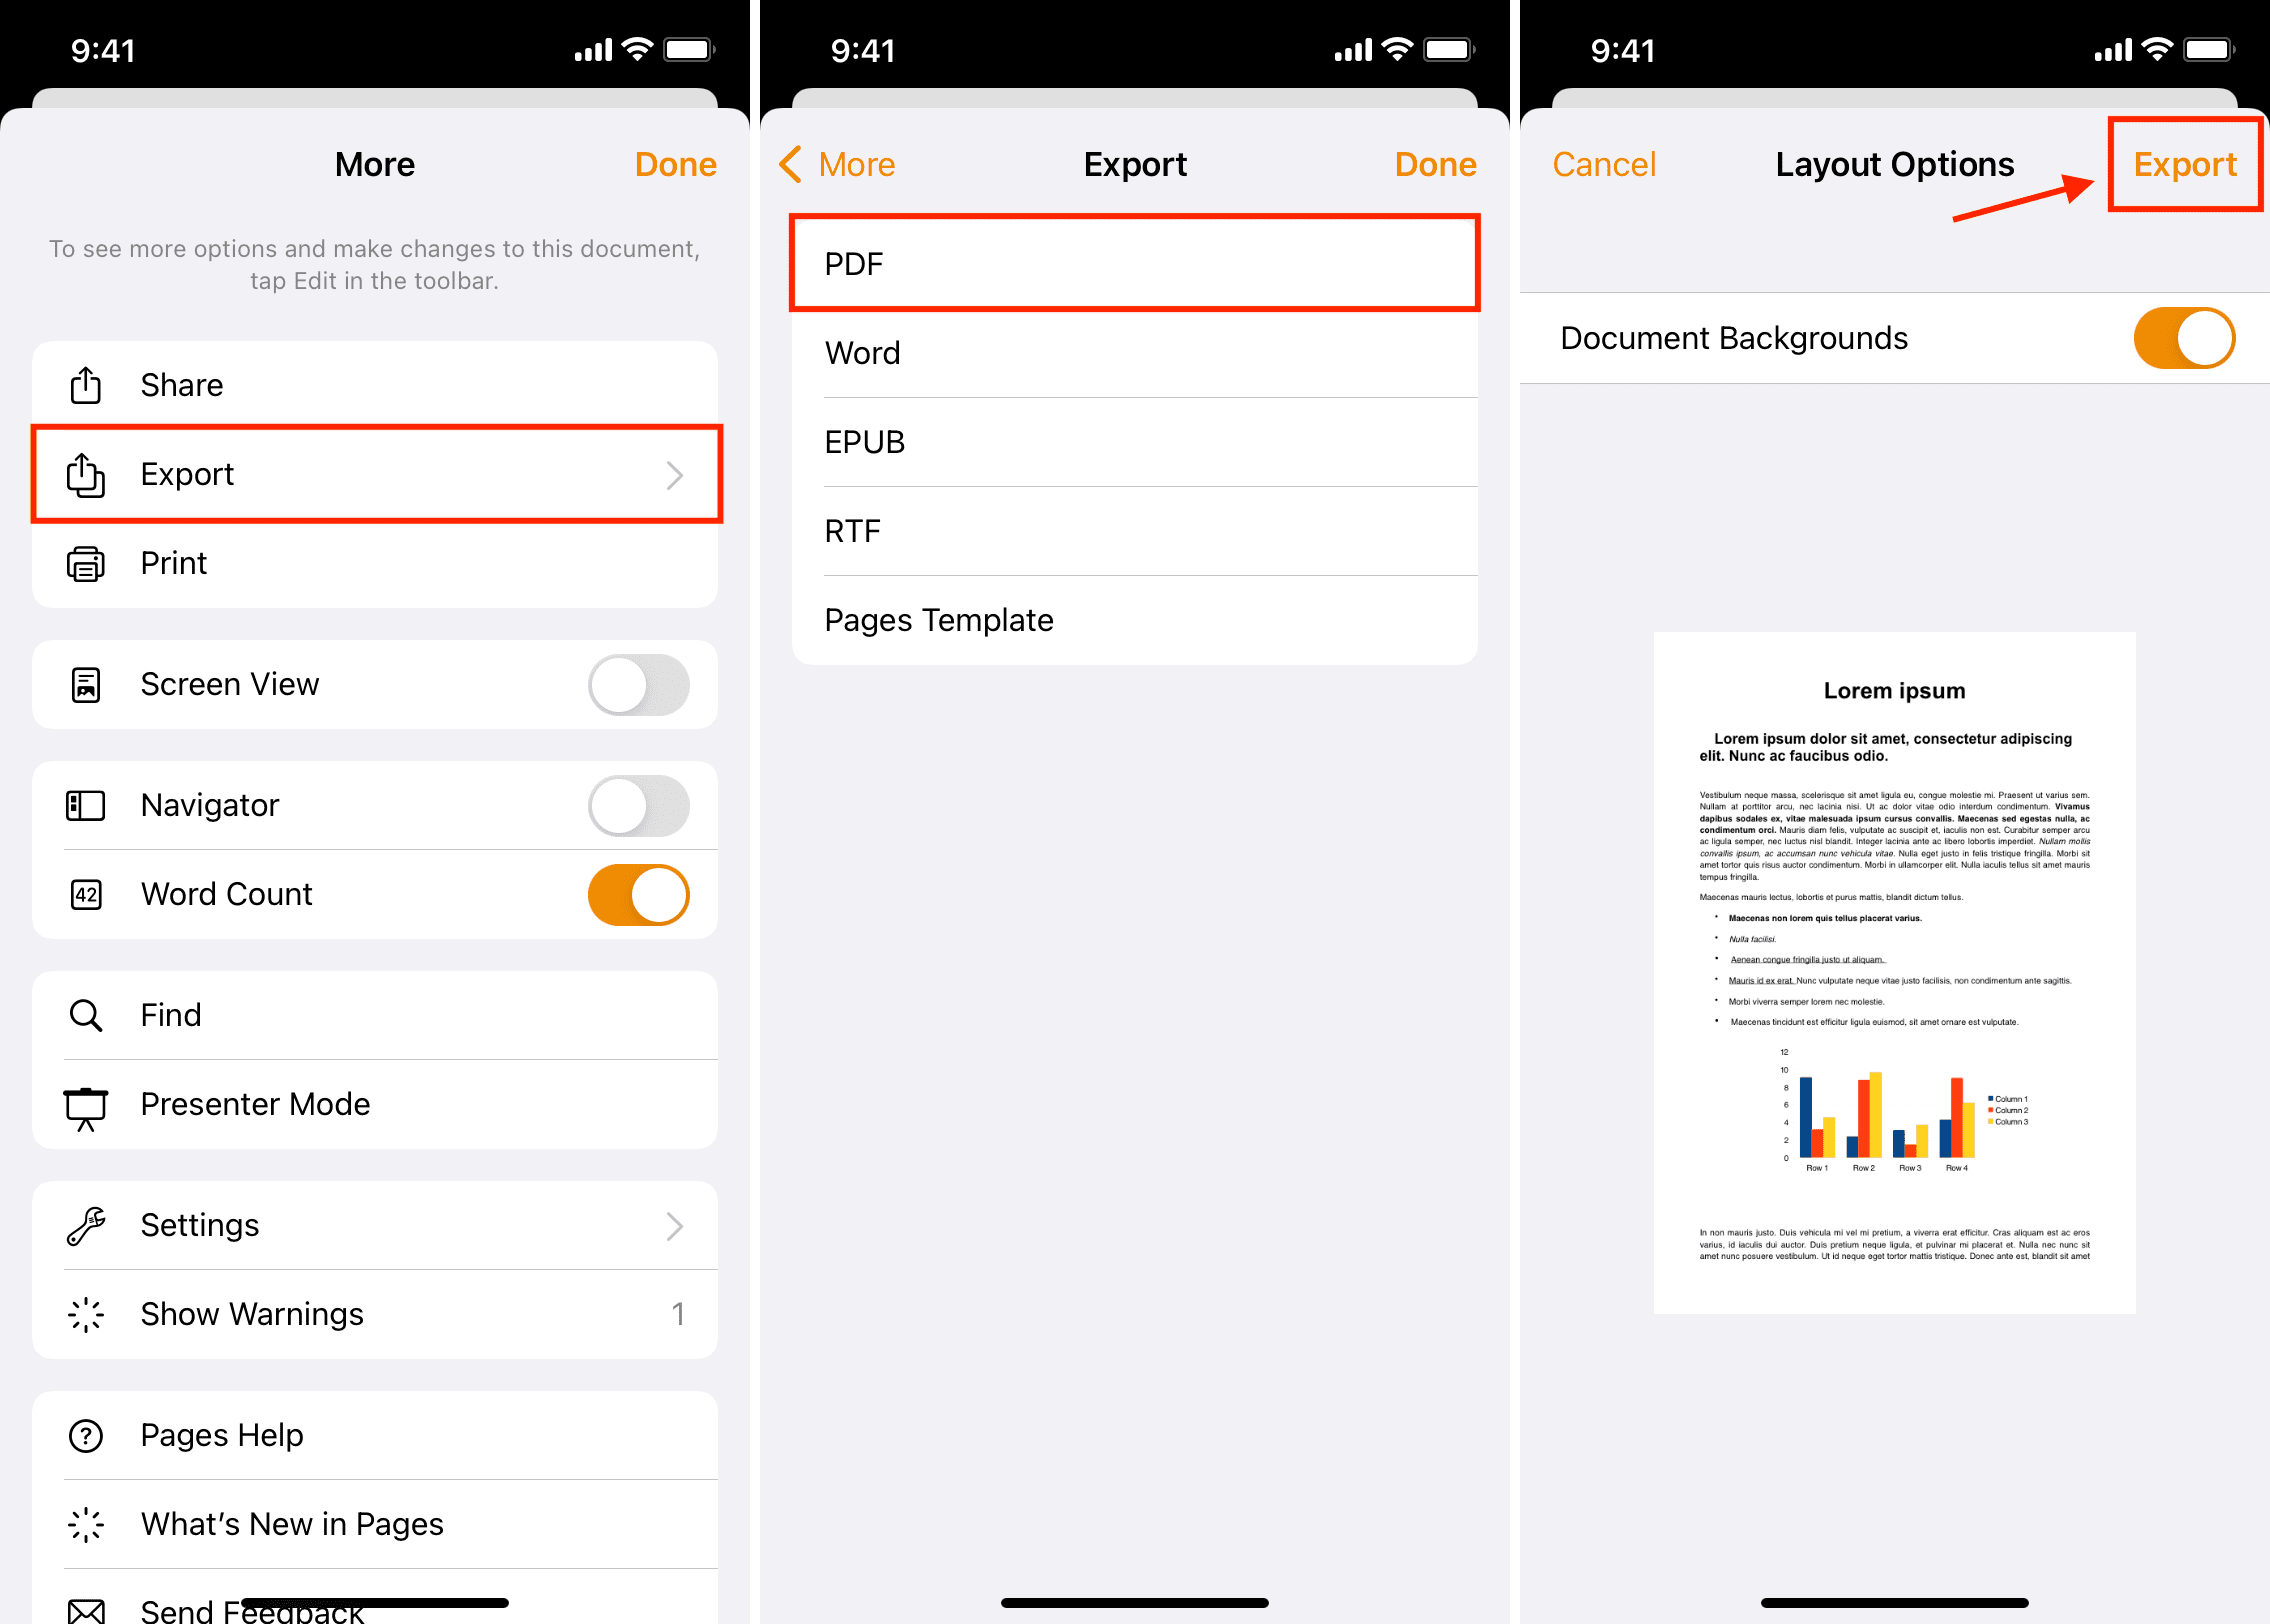
2) Choose the more icon (three dots inside a circle).
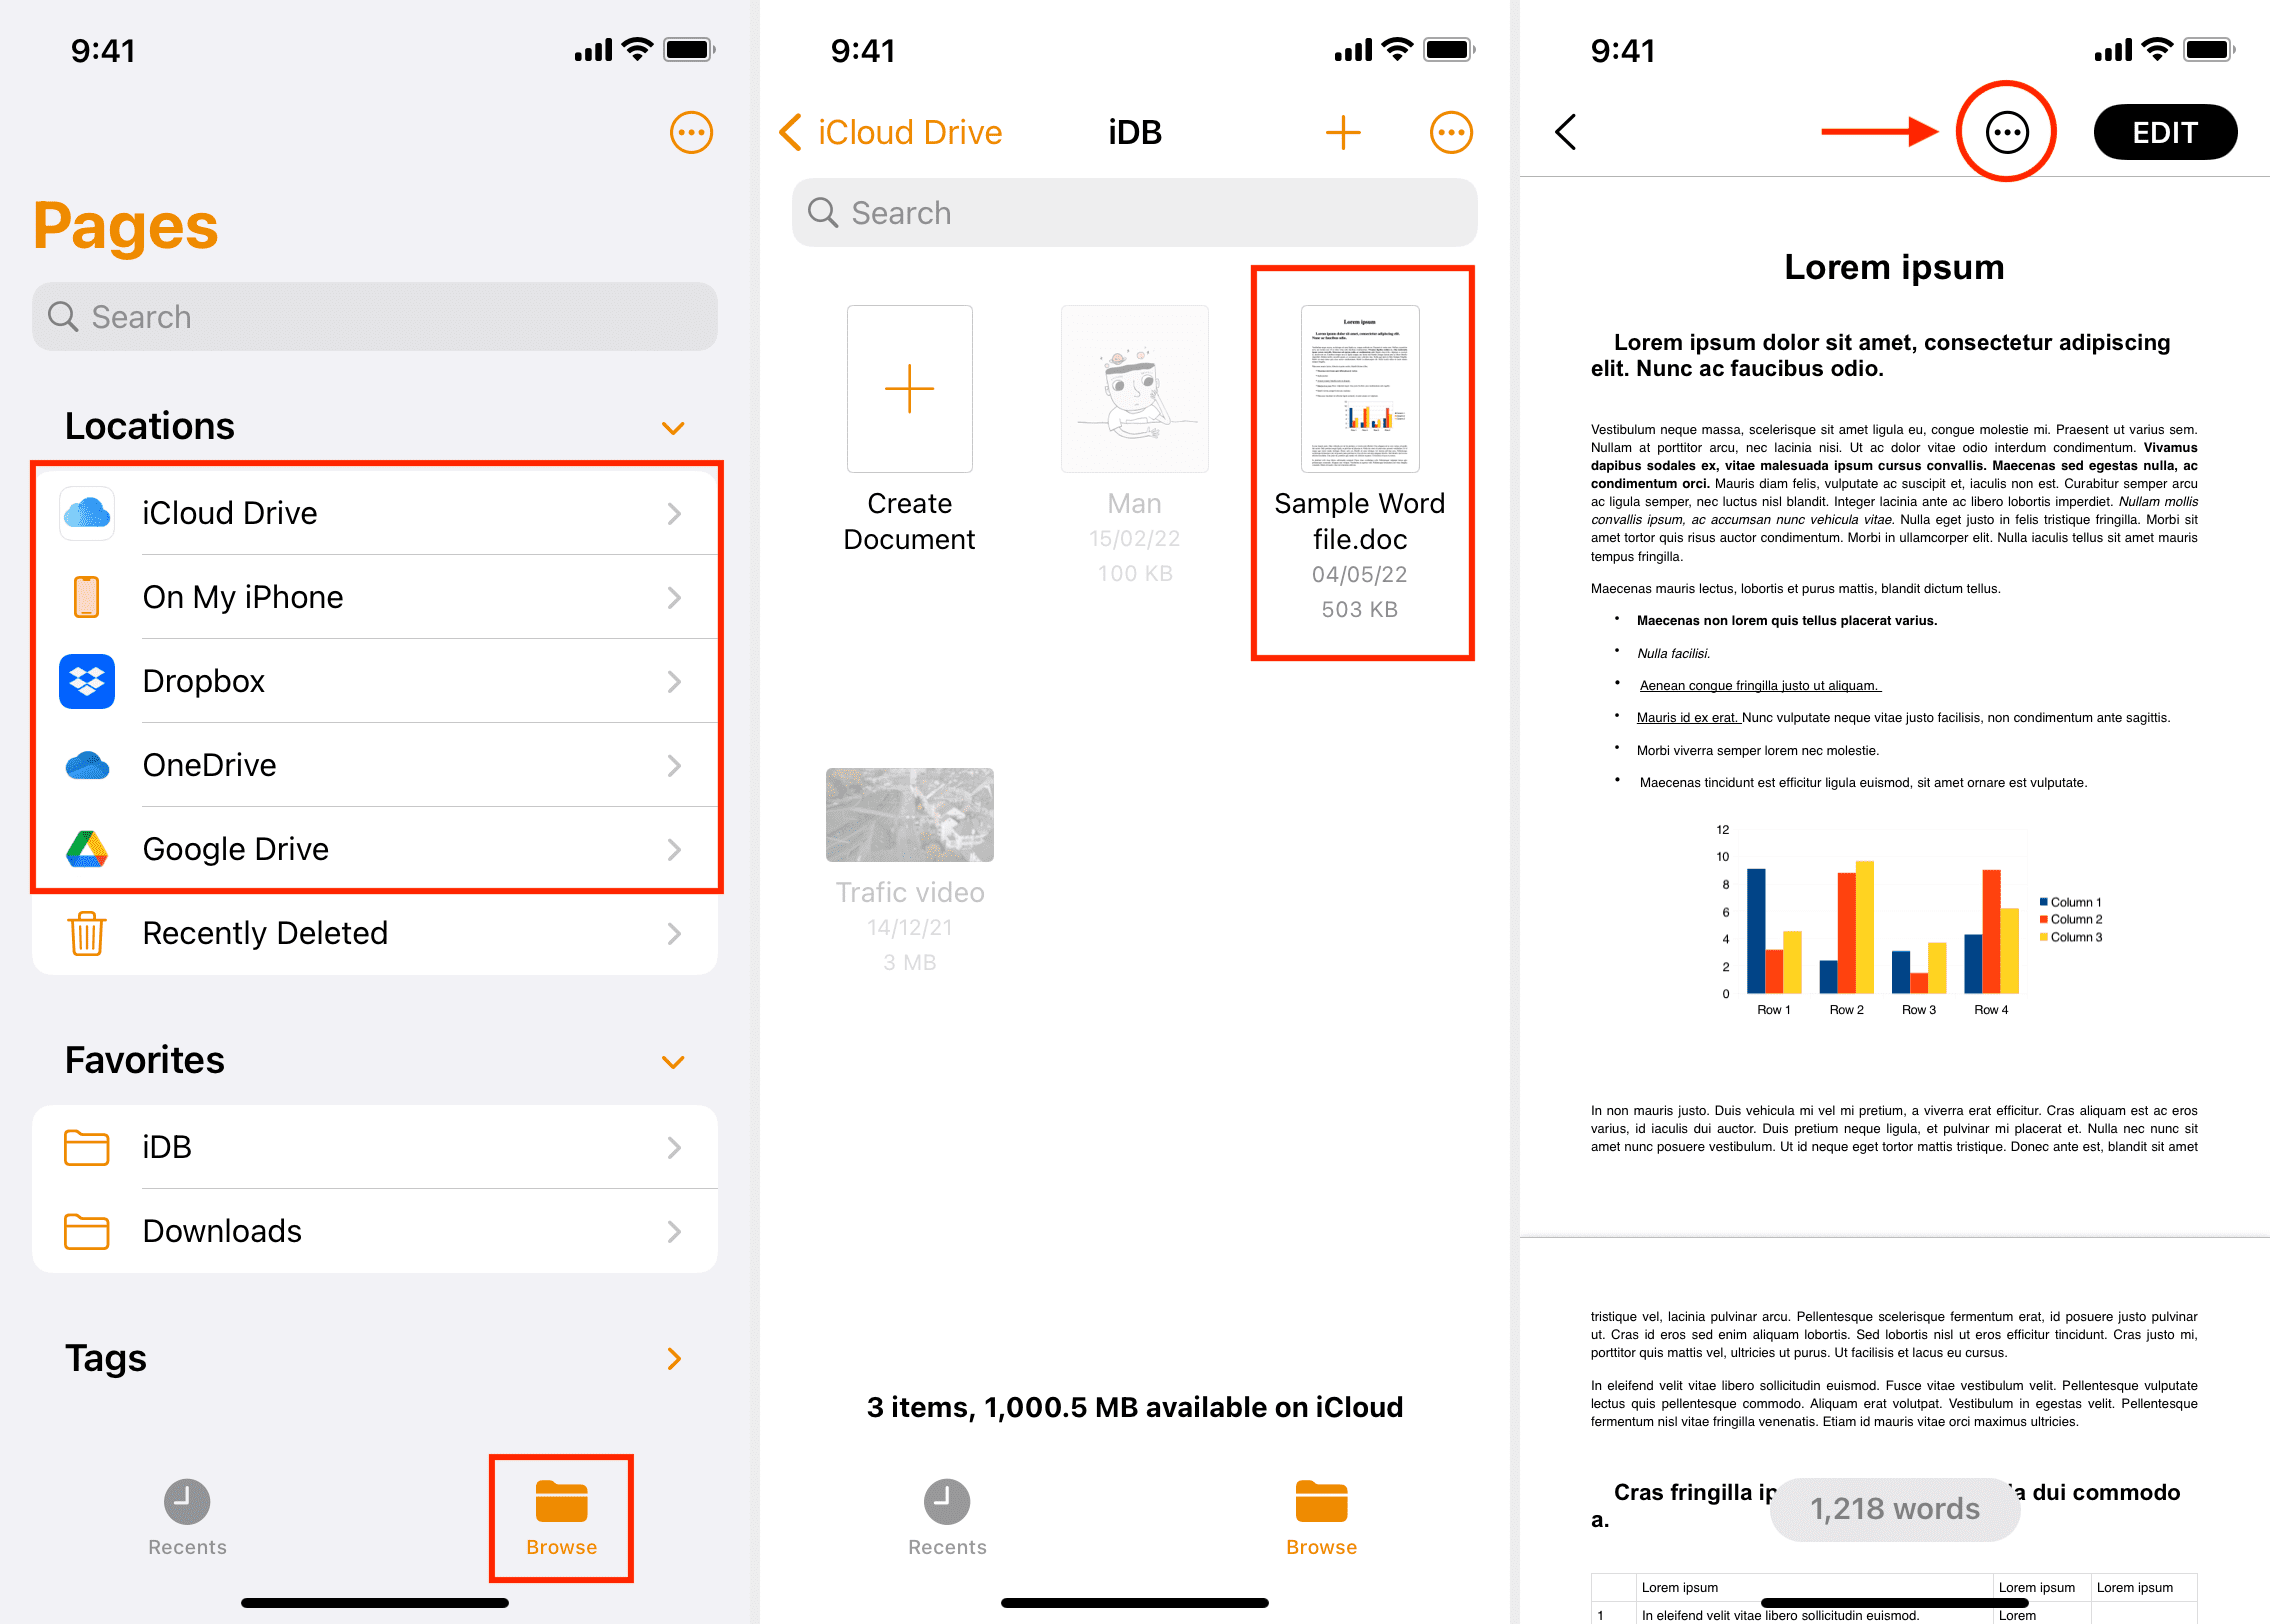
3) Select Export and choose PDF from the list of formats.
4) Tap Export, and it should show the Share Sheet.
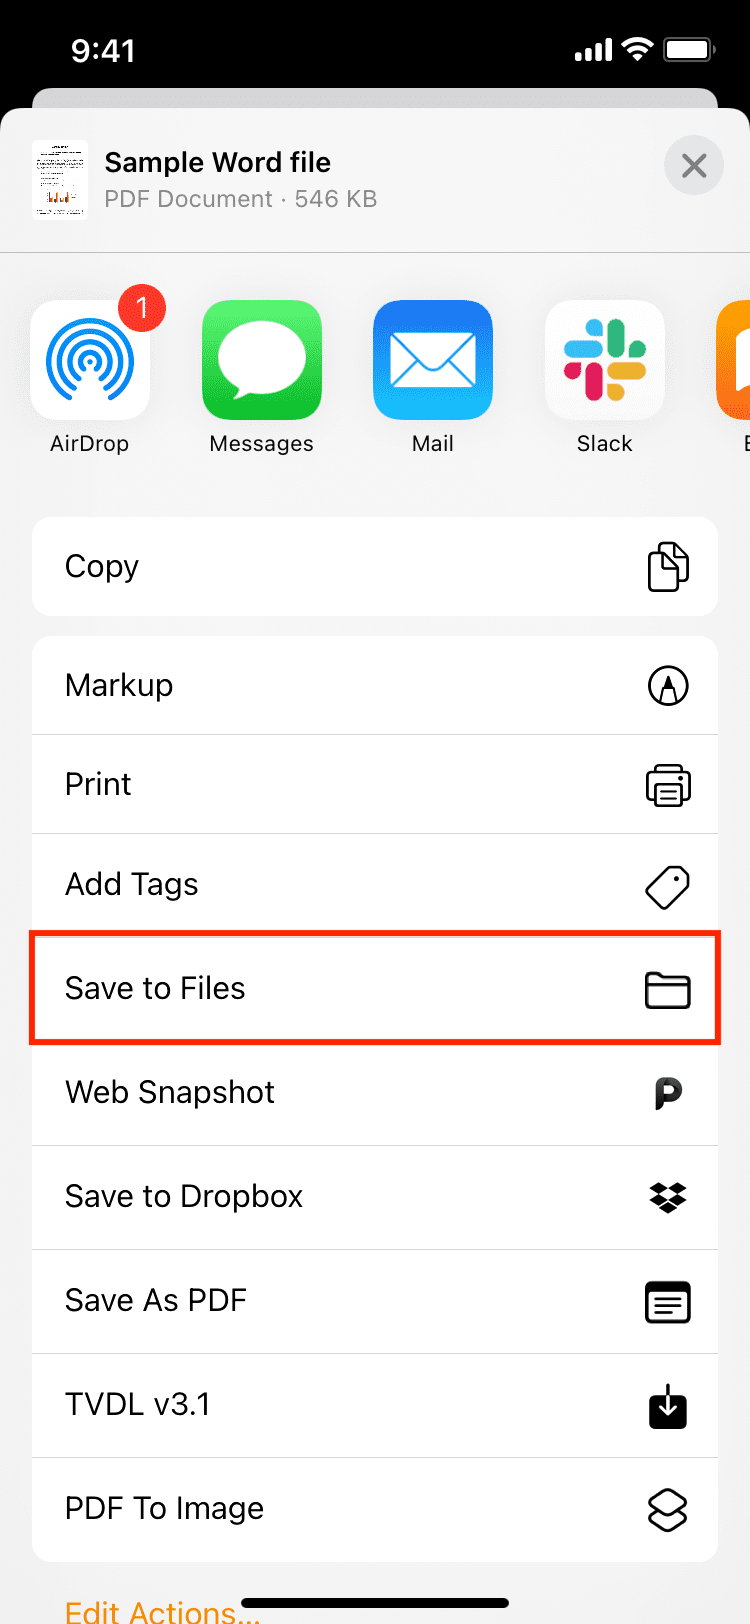
5) From the Share Sheet, tap Save to Files > choose any location > Save.
This is how you can quickly and easily convert Word files to PDF on your iPhone, iPad, or Mac.
Besides the above options, you can also use dedicated iOS, iPadOS, or macOS apps that can do this job for you. Simply open the App Store and search for Word to PDF converter. Go through the search result and download an app with good ratings. However, keep in mind that, unlike the above methods, most third-party apps will either require payment or show several ads before you can complete the Word to PDF conversion.
Read next: